Print Specs
(This is for the Home Elevator only)
Not for porch lift
Specifications Sheet
1. Hydraulic Residential Elevator One (1) unit serving 1st, 2nd and 3rd floors
2. Capacity 750 lbs.
3. Landings Two (2)” Three (3)” in line openings
4. Platform Size 48″ x 48″
(subject to final on site hoistway measurements).
5. Unit 1
6. Speed 30 FPM
7. Cab Specifications ½ Cabinet grade material and choice of Unfinished Birch and one (1) handrail.
8. Cab Lighting One (1) recessed light.
9. Elevator Cab Gate Accordion Door (Optional Styling)
10. Cab Height 6′-8″
11. Travel 24′-0″ (subject to final on site travel measurement)
12. Flooring Finish flooring by others; ¾” standard threshold provided.
13. Power Unit hydraulic pump.
14. Hall Stations Stainless Steel
15. Cab Operational Panel Stainless Steel
16. Elevator Control Box
17. Wall mounted full function elevator phone
18. Interlock Eliminates micro switches and eventual breakage
19. Emergency System Interior cab emergency lighting (additional charge on request).
20. Emergency Lowering Battery back-up emergency lowering system in case of power failure (additional charge on request).
21. Warranty One (1) Year Limited Warranty on complete system
Work To Be Done By Others
Threshold
- Contractor shall provide a threshold from each floor to be within ½” minimum to 1 ½” maximum of the elevator floor after the elevator has been installed.1
Hoistway
- Should be plumb from top to bottom of hoistway within ¼”
- Clear finished hoistway dimension is defined as finished after the support beam, drywall, & door casing installed 54″x 60″.
- Overhead (measurement top level floor to top level ceiling) should be at least 90″
Hoistway Doors
- Solid core doors or metal are specified to allow for proper hoistway interlock installation
- Hardware on doors must be present on hoistway doors for interlock installation
- Door framework to be plumb one above the other floor to floor.
Pit
- The clear finished walls of the hoistway should be flush with the walls of the pit
- A minimum recess in slab of 8″ is desired.
- The floor of pit should not be poured with concrete.
- Pit must be kept clean and free of debris and water
Mounting Supports
- Wood to be either P.T. or Fir
- Each support beam to be constructed of double 2″ x 8″ in rough frame. The entire height left and right of hoistway door opening center of 54″ x 60″ (see shop drawings).
- All hardware on face of support must be countersunk
- Face of mounting supports must be flat and plumb from the top to bottom of the hoistway with ¼”
- Nothing should be allowed to protrude further than the face nor cover the face of the supports
- Should concrete walls be used for the hoistway ‘ the wall that the rail system is to be mounted to should be solid pour concrete or have specific cells poured solid with concrete to be used as the mounting supports described above
Location For Pump/Control Unit
- Area needed for unit should be a minimum of 48″ x 48″ unless otherwise specified by AEL, or city and state code.
- Install a platform to support pump unit 250# min. 12″ x 24″
Power
- Installed at location of pump unit ” 4 wire 230V ” 1- 60 ” 30 amp fused double poll / single throw lockable disconnect switch box
- Contractor to provide Hall Station Electrical Box to be located at each floor door opening and installed by contractor.
- 110V plug in outlet and 100V lockable disconnect box
Telephone Line
- An extension of the main phone line should be run to disconnect location
Flooring Inside The Cab
- Vinyl, carpet, tile, wood or marble can be used. Please notify us of finished thickness ASAP, so that cab can seal properly.
Miscellaneous
- Other subcontractors on the job must not intrude into the hoistway with their wires, pipe, duct, etc.
- Care should be taken by other subs not to damage wiring we install, this usually occurs when drywall & trim work is done.
- If painting or spraying is to be done in the hoistway, our equipment should be covered to keep overspray off or we will ask that equipment be cleaned off by other
- All wall patching, painting and grouting by other
- As the elevator is installed, we hold the contractor responsible for damage to our equipment by other subs. This is beyond our control since we are not on the job each day.
- We mention the above because we feel this information will help in the installation process of the elevator in addition to keeping back charges down should we have to do the work twice
- Construction use of lift is by signed release only
- There will be a charge of $500.00 each time the installation crew arrives at job site location and G.C., Contractor or homeowner has approved the work done by others with A.E.L. complete and work is not complete according to the list above.
- We are always available for consultation. Please call if there is a question or change in specifications needed!
SHOP DRAWINGS
WORK BY OTHERS
CONSTRUCTION REFERENCE CODE
1. Hoistway
2. 220 disconnect box.
3. Call station outlet
3-a 110V disconnect box
4. Solid core doors. Provide at each landing.
4-a Optional additional access door.
5. Hoistway finished with plywood or drywall. Square, plumb, clean and built to dimensions shown.
6. Threshold build out at each landing. Not less than 3/4′ or more than 1- 1/2′ to the cab.
7. Continuous 2″ x 8″ at center of each wall left to right of door opening (minimum height of 7′ from last landing.)
8. Pump stand 2″x12″x20″ pressure treated wood 48″ to 58″ high.
9. Equipment room shown adjacent to hoistway but may be located up to 20′ away.
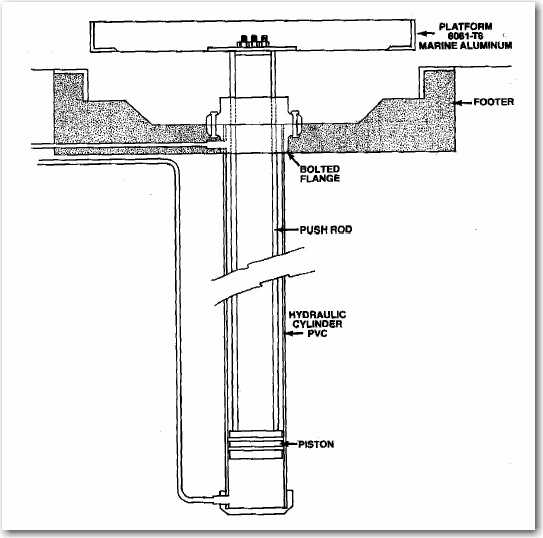
10. 1- ½” schedule 40 PVC run from hoistway below pit to equipment room. Stub as shown and cap both ends.
11. 110 volt electric outlet.
12. Hoistway, equipment room, floors, ceilings, etc as shown on drawing.
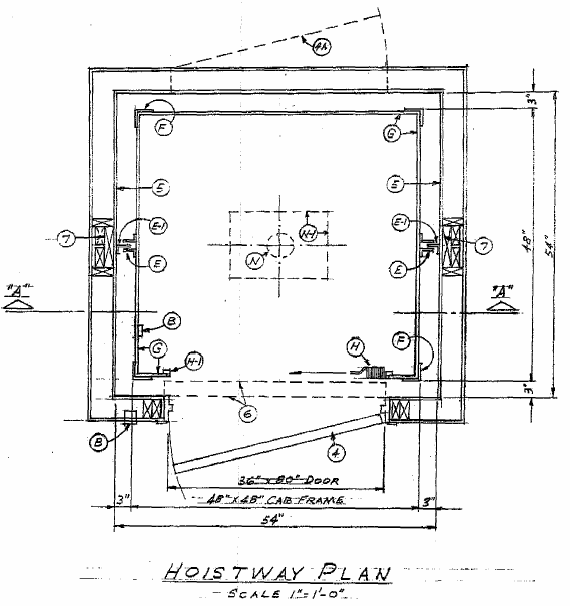
Hoistway Plan
Construction Reference Code
A. Lift control box
B. Call buttons (at each landing in hallway and cab interior)
C. Travel cable
D. Lift pump
E. Cab shoes
E-1 Cab guide rails
F. Aluminum cab framing (3″x3″x3/8″ stock)
G. Lift cab walls (plywood ½” stock)
H. Accordion door (cab gate)
H-1 Accordion gate sensor
L. Ceiling grille
M. PVC cylinder
N. Push rod (plunger)
N-1 Aluminum plate secured to cab frame
O. Cylinder head
P. Reservoir tank